
Fotolia
How does Excel's Insert Data From Picture feature work on mobile?
The Microsoft Excel mobile app allows users to upload data through a photo. IT professionals should learn how this process works so they can test its efficacy and train users.

Microsoft recently introduced a new feature to the Excel mobile application that is a true game changer for data entry. But IT professionals should test this feature before their organization incorporates it into existing workflows.
This feature is called Insert Data From Picture, and it's available in the latest versions of the Excel apps for iPhone, Android tablets and Android smartphones.
The Insert Data From Picture feature allows users to take a photo of a hard-copy data table and import it into the Excel format so users can edit it. This means users don't need to manually enter a hard copy of a data table into Excel, which can be a slow and laborious process.
This is one of Microsoft's AI features for Office, and it is easy to use.
How does the Insert Data From Picture feature work?
Organizations that incorporate this feature into an existing workflow must first understand how this data-upload process works. In some situations, IT professionals will have to train users on how to use the Insert Data From Picture feature.
With the following steps, any user or IT professional can perform this new Excel data entry technique.
Step 1: Download and install the mobile Excel app to the desired iPhone, Android smartphone or Android tablet from Apple's App Store or Google Play.
Step 2: Open Excel and choose New File.

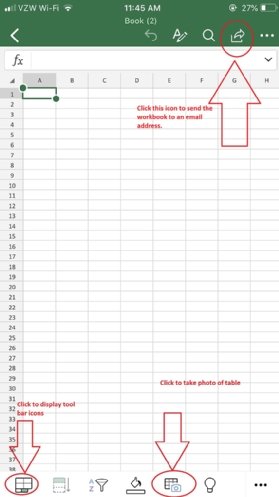
Step 3: Display the toolbar at the bottom of the screen by clicking the icon in the lower left of the screen.
Step 4: Open the Insert Table From Picture feature by clicking on the camera icon at the bottom of the screen, as shown in Figure 1.
Step 5: Click Turn On when prompted about Microsoft Intelligent Services. Each user only needs to do this once. The user must also permit Excel to use the device's camera.
Step 6: Excel will open the Camera app, so the user can take a photo of the table. The user should align it as squarely as possible with the table.
Step 7: Crop the table so it is square with the sides of the photo, and then press Done. This will take a minute to process. Then, click the Insert button.
Step 8: Click the Review Changes button and correct any errors the Excel app made. These will mainly be inputs that Excel didn't understand. Users can also opt to skip this step and clean it up later in the full view of Excel. In this case, select Open Anyway.
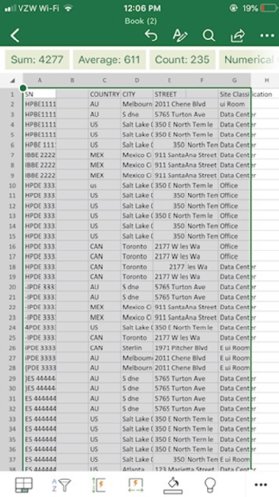
Step 9: The data will appear in a workbook format.
Potential issues and shortcomings
The data may not always input correctly. It's unclear what causes this, but in some cases, the user can simply repeat the process with a new photo and ensure it was cropped properly.
In a test scenario with a table of location data (Figures 1 through 3), the second attempt fixed the issue.
Organizations probably shouldn't rely on the Excel mobile app to view and edit large amounts of data. Users can send the Excel document via email using the icon at the top of the screen, as shown in Figure 1, and open it on a desktop version of Excel. The view of the workbook in Excel on the desktop will be easier to work with.